

How To Add A Pitch Only On One Side Of Flat Roof
How to Roof a Firm
Our pros bear witness you how to practise it correct—and relieve thousands!
![]() Time
Time
Multiple Days
![]() Complication
Complication
Intermediate
![]() Toll
Toll
Varies
Introduction
Follow along as we shingle a house from underlayment to ridge cap. The article includes detailed photos, drawings and clearly written instructions for every step of the chore.
Tools Required
Materials Required
- #xv or #30 Felt underlayment
- Asphalt shingles
- Drip edge
- Hook blades
- Roofing nails
- Sealant
- Self-agglutinative waterproof underlayment ("ice and water shield")
- Staples
- Step and dormer flashing
- Valley flashing
- Vent flashing
Can y'all roof a house yourself?
Make no bones about it—covering is difficult work. There's no hiding from the elements. Yous can't be afraid of heights and you demand to be pretty fit. Before committing to this how to roof a house project, try this: Leave a ladder and climb upward onto your roof. If y'all can't walk around on it comfortably, hire a pro. If you passed this start test, become to the lumberyard or home center and throw a bundle of shingles onto your shoulder. Imagine yourself conveying that load upward a ladder…many, many times.
If yous're still feeling positive about this how to roof a house at this point, why not give it a shot? You can skip a lot of heavy lifting by having your roofing supplier hoist the shingles onto the roof. Be sure you spread the load evenly beyond the length of the roof's meridian. Even so, don't take the shingles delivered to the roof if you still have ii layers of old shingles to tear off—information technology could be as well much weight for your trusses.
After you've obtained a let (if needed) and safely stripped the roof clean, nail drip edge flashing flush along the eave.
Windblown heavy rain and/or snowfall can force water up and nether even properly installed shingles. Even worse are ice dams (frozen h2o/snowfall that builds upwards on roof edges), which can wreak havoc by assuasive water to seep up nether lower shingles and then drip into your house. To baby-sit confronting such seepage, apply self-agglutinative waterproof underlayment ("water ice barrier"), which adheres tightly to bare roof capsule and seals effectually nails driven through information technology. Buy it at covering supply companies or habitation centers. In severe climate regions, well-nigh edifice codes require applying it 3 to half-dozen ft. up from the eave (minimum of 2 ft. past the exterior wall). Call your building inspector for local details.
Encompass the rest of the roof with No. fifteen asphalt-saturated felt underlayment (some codes may crave No. xxx). Each layer overlaps the lower one by at least ii in. Follow this step by nailing drip edge along rakes (sides of roof), on top of the underlayment. As you did with the flashing, always lap upper pieces over lower pieces. The felt keeps the roof deck dry earlier shingles continue, protects confronting wind-driven rain as shingles fail and increases fire resistance.
Next, find the center of the roof at the top and the eave, then snap a vertical chalk line. Most pros utilize this line to begin shingling, working left and right toward the rakes. Shingle manufacturers may recommend starting at the left rake edge, so check packet recommendations.
For the get-go row of shingles, chosen a starter form or strip, you cut the tabs off 3-tab shingles and apply them with the cocky-sealing agglutinative strip facing up along the eave. Make certain this row has a slight overhang (1/iv to 3/8 in.) beyond the drip edge. The starter course protects the roof by filling in the spaces under the cutouts and joints of the next row (first course) of shingles. The adhesive on the starter course seals the tabs of the get-go full course.
Finally, blast the first course of shingles straight on elevation of and flush with the starter class. Use four roofing nails per shingle, as indicated on package instructions (six nails in high-air current areas). Once this course is laid, you can begin snapping horizontal chalk lines up the roof to ensure straight rows. Brand certain to expose 5 in. of the shingle tabs where the bottom edge of the tab meets the height of the cutout.
Tear off the quondam shingles
Information technology's impossible to properly install new flashing and underlayment if you don't tear off the old roof beforehand. When tearing off the existing shingles, be sure to remove all the erstwhile nails or pound them flat. Protruding nails will tear holes in your new shingles. If yous have movable items near your business firm and yous're worried they might become damaged, relocate them. Invest in a few big tarps to protect your plants and landscaping and to grab the thousands of nails that will rain down off the roof. It can be downright incommunicable to remove old self-stick water ice-and-water underlayment, but information technology's OK if you accept to leave it in identify. And if at all possible, have the rented trash bin parked close to the house so you can toss in the onetime shingles right from the roof.
Figure A: Roofing Overview

This cutaway cartoon shows the steps involved in roofing a house.
Install the drip edge
Metallic drip edge isn't unremarkably required (check with a local building official), but it gives roof edges a prissy finished look, prevents shingles from crimper over the edge, and keeps water from running directly downwardly your fascia boards.
Earlier you install the underlayment, fasten the baste edge that covers the fascia on the eaves. The whole length of the fascia is probably non perfectly directly, so don't snap a line; just concur the drip edge snug against the fascia and fasten it through the top into the decking with roofing nails. Nail it every couple of feet.
Install the baste edge on the gable ends of the roof after you end installing your underlayment. Start at the bottom side of the gable, and overlap the sections of drip edge a few inches every bit you lot piece of work your fashion up the roof (see Figure A). Use a tin snips to cut the drip border to size.
Stay Safe
When it comes to roofs, even the best condom equipment is no substitute for common sense and good judgment. Here are some tips for working safely on a roof:
- Leave steep and/or loftier roof piece of work to the pros. No amount of coin you could salvage is worth the risk of death or a lifelong disability from a autumn.
- A autumn protection kit (harness, rope and hook) just costs about $100 at dwelling house centers.
- Moisture roofs are glace. Wear shoes with soft safety soles for extra traction.
- Continue the roof swept clean of dirt and debris.
- Anybody on the footing should wear a difficult hat—even the most careful worker can drop a tool off the roof.
- Ever await and call out before tossing anything downwards.
- Carefully position ropes and extension cords so they're non underfoot.
- Cheque the weight rating on your ladder—information technology needs to hold y'all plus 80 lbs.
- Extend the top of the ladder at least 3 ft. above the roof edge so you'll have something to hang on to as you step onto and off the roof.
- Never stride on any of the ladder rungs above the roof.
- Set upwardly scaffolding to install the drip edge and starting time few courses.
Project step-by-step (15)
Step 1
Roll out the cocky-stick underlayment
Stick on the underlayment
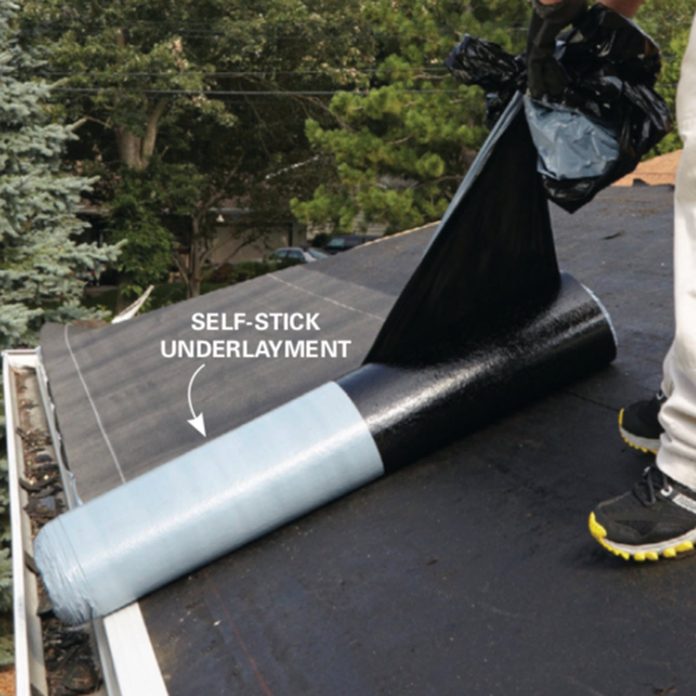
Protect the roof against ice dams and windblown rain with self-stick ice-and-water underlayment. Peel off the top half of the plastic backing as you unroll the underlayment.
Step ii
Peel off the bottom backing
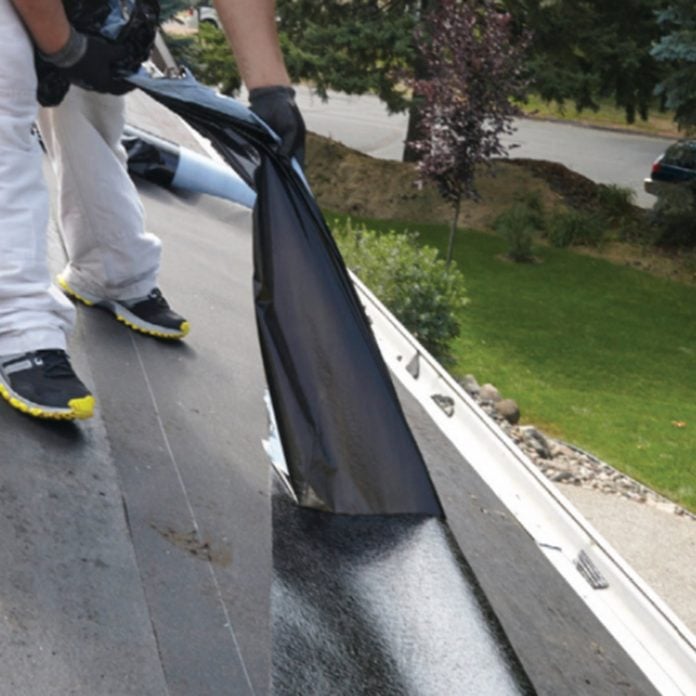
Make sure the underlayment lies polish earlier yous nail the peak border. And so pull off the lower half of the backing.
Stick the bottom part of the underlayment to the roof of the business firm.
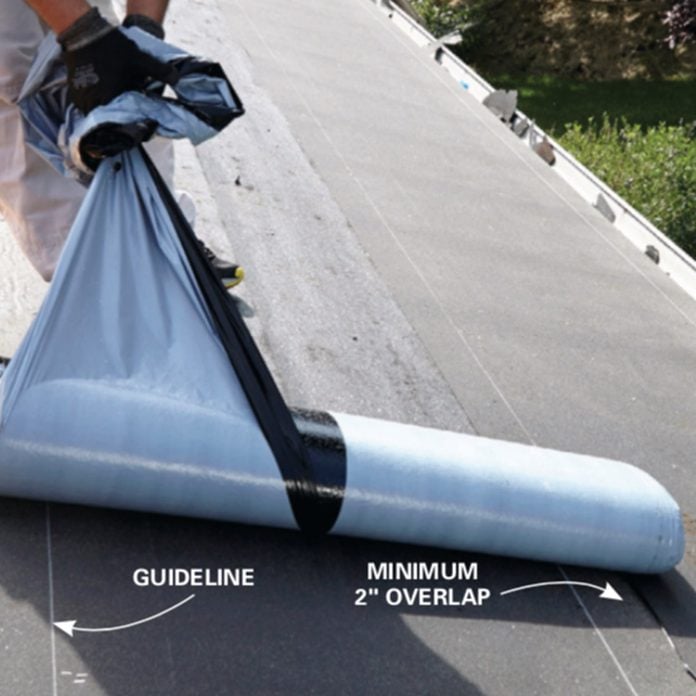
Install the second course just similar the first, using the guidelines on the underlayment to get the correct overlap. When an water ice dam forms on a roof (usually caused by poor cranium insulation/ ventilation), ice and water can work their way up nether the shingles and leak back into the business firm. Also, strong winds tin accident rainwater under shingles. Self-stick covering underlayment (often called "ice-and- water" underlayment) can forestall this because information technology sticks to the roof decking to seal out water. It also seals around nails, which keeps h2o from leaking through nail holes.
Rolls of cocky-stick underlayment accept a plastic backing then the fabric won't stick to itself. The backing is separated down the middle. Line upward the lower border of the roll with the exterior of the drip edge. Pare back role of the uppermost backing on the roll, and nail the top corner of the underlayment to the decking. Start pulling the curlicue across the decking using the bankroll, making certain the material is lying as apartment and as direct as possible as you pull.
You lot'll be able to roll out long sections at a time if you have a low-pitched roof, just the underlayment may slip off the eaves on steeper roofs, so scroll out no more than 10 ft. there (Photo 1). Information technology's important to make certain all your underlayment lies flat before you fasten it to the decking. Ripples and lumps can telegraph through the shingles and may exist noticeable from the ground.
On warm days, self-stick underlayment will stick to clean decking without whatsoever fasteners. Fasten information technology to the roof with staples or nails on colder days, merely but fasten the top part of the underlayment until you go back and peel off the bottom half of the plastic backing (Photo 2). The college the temperature outside, the stickier the adhesive on the rolls gets. This ice-and-water underlayment is tricky to work with on super-hot days; go on that in listen when y'all plan your project.
Many severe climate areas crave cocky-stick underlayment to be installed at least 2 ft. in from exterior walls. This means y'all'll need two rows if yous accept two-ft. eaves. Any two sections of underlayment on the aforementioned row should overlap a minimum of 6 in., and each class should embrace at least two in. of the one beneath information technology (Photo 3). These rules tin can vary, and then always consult your local building official.
![]()
Step 3
Cover the roof with felt newspaper
Roll on the felt paper
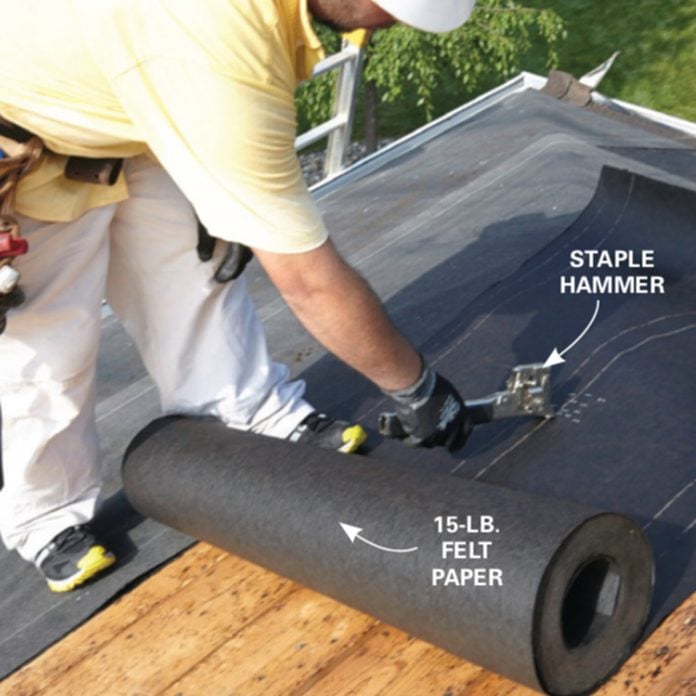
Cover the roof above the underlayment with roofing felt paper. To start each class, drive a dozen staples grouped close together. And so unroll the felt and straighten out the row earlier you add more staples.
Footstep 4
Don't skimp on staples
Place staples no more than 12 in. apart. Paper with too few staples will tear out nether your feet and could cause a fall.
Step 5
Overlap the ridge

Run the felt paper over the peak and overlap it onto the other side. Do the same when y'all attain the meridian from the other side of the roof.
Felt paper, besides chosen tar newspaper or builder's paper, helps shed water that gets under the shingles, protects the cobblestone shingles from the resins in the woods decking, increases a roof's burn rating and helps proceed your house dry if it rains during the chore. Most roofing suppliers conduct fifteen-lb. and 30-lb. rolls of felt. For near applications, 15-lb. felt works just fine. Install xxx-lb. felt if you plan to leave the paper exposed for more than a couple of days considering it wrinkles less then fifteen-lb. And 30-lb. felt doesn't tear as hands, so information technology'south safer to walk on when you're working on steeper pitches.
Beginning a row by rolling out a short department of newspaper and securing it with a dozen staples grouped together near the center of the paper (Photo iv). That way yous'll then be able to roll out a long section and swing information technology back and along until your overlap is even. Each row of newspaper should overlap the one beneath it at to the lowest degree 2 in. There will be overlap lines printed on the paper to guide you. Overlap seams on the same row vi in.
Practice on a couple of 10-ft. sections until you become the hang of it, and don't roll out a 25-ft. department of paper on a steep roof or when it's windy. If y'all're fastening the paper with a staple hammer, endeavor to get a staple in every square human foot of the paper (Photograph 5). That may seem similar a lot, merely insufficiently stapled paper can tear out nether your feet, which could consequence in a fall. Don't walk on any paper that isn't completely stapled down. Fasten the felt with cap staples/nails if you lot're working on a windy day or are working on a roof with a pitch steeper than 6/12.
When you attain the top of the roof, run your concluding row long (Photograph six), and pall the paper over the tiptop (top ridge) onto the other side. When you lot achieve the top on the other side of the roof, run that paper upwards and over as well. That way you lot'll end upwards with a watertight ridge. Your local edifice official may desire to come up out to audit your roof at this indicate, simply sometimes you can get by with snapping a few photos. Ask virtually the inspection schedule when you pick up your permit.
Footstep six
Waterproof your valleys
Flash the valleys

Install self-stick underlayment nether the metal flashing. If you demand more than one flashing in your valley, lay them both in place and brand certain they're straight earlier nailing them down.
Pace seven
Fold flashing over the peak
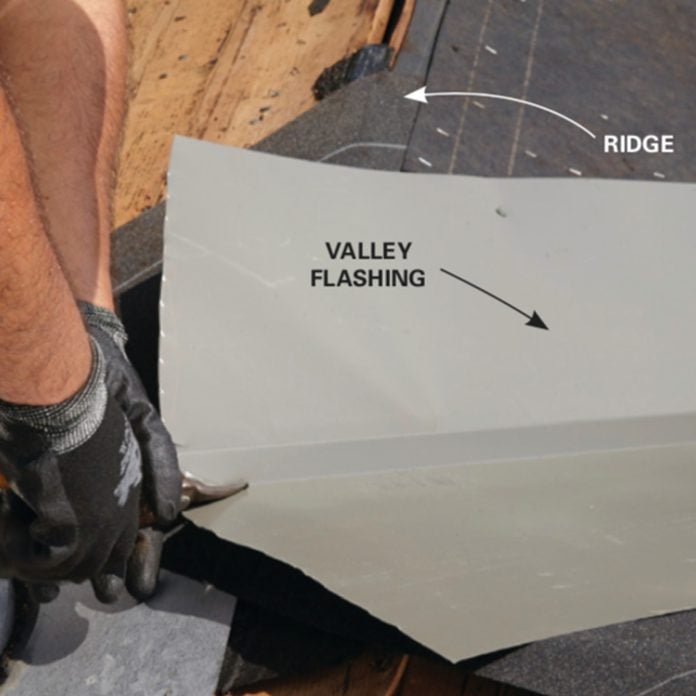
Cut the flashing back to the acme along each pucker. Then fold the flashing over the peak and embrace the cut ends with cocky-stick underlayment. Roof valleys channel a lot of water, and so they need extra protection. Start by installing self-stick underlayment on the decking. This procedure is much easier with ii people. Cutting the underlayment to size (or in sections for long valleys), and peel off the entire plastic capitalist. With a person on each cease, fold the underlayment in on itself, pasty side out. So lay it into the valley and unfold information technology. Effort to push it down into the crease of the valley as tightly as possible. If this self-stick ice-and- water underlayment bridges both sides of the decking, leaving a gap underneath, information technology could tear one time you install the metal valley flashing. Run the underlayment by the drip edge at the eaves, and trim off the actress with a utility knife. In one case it's smooth, nail information technology down on the exterior edges.
Finish installing felt paper on the rest of the roof, overlapping the self-stick underlayment. Be careful when you trim dorsum the felt paper so y'all don't slice into the underlayment. Photo vii shows the underlayment covering the felt on ane edge a couple of inches. This will go on water farther away from the within corner of the fascia. Y'all can extend the center out even more but non then far that water overshoots your gutters if you have them.
Be careful not to nail your shingles any closer than eight in. from the heart of the valley. In one case all the shingles are installed, snap lines as guides to trim them off. There should be half-dozen in. of the valley exposed on pinnacle (3 in. on each side), and each side of the valley should widen 1/8 in. for every linear foot of the valley run. So, if you have a valley run of xvi ft., your valley exposure would be vi in. on the top and 10 in. on the lesser.
Some other way of dealing with valleys is to use the "weave" method, which we don't cover in this story. The shingles are woven together from both sides of the valley. The benefit of a woven valley is that it doesn't leave an exposed flashing, which results in a cleaner look. The downfall is that leaves and twigs don't become done away as hands, which can crusade little water dams. This is especially true for roofs with low pitches.
Avoid Extreme Temperatures
Avoid roofing your house in below-freezing temperatures. The shingles won't stick together, which makes them prone to wind damage. A couple of common cold days won't cause trouble, but subsequently weeks and months, the adhesive strips on the shingles can attract grit and fail to seal fifty-fifty when the weather does warm upward. And try to avert working on sunny days when the temperature is in a higher place 90 degrees. The ice-and-water underlayment gets overly sticky and hard to work with, and the shingles get soft and are easily scuffed past feet and tools.
Step viii
Begin with starter shingles
Install starter shingles
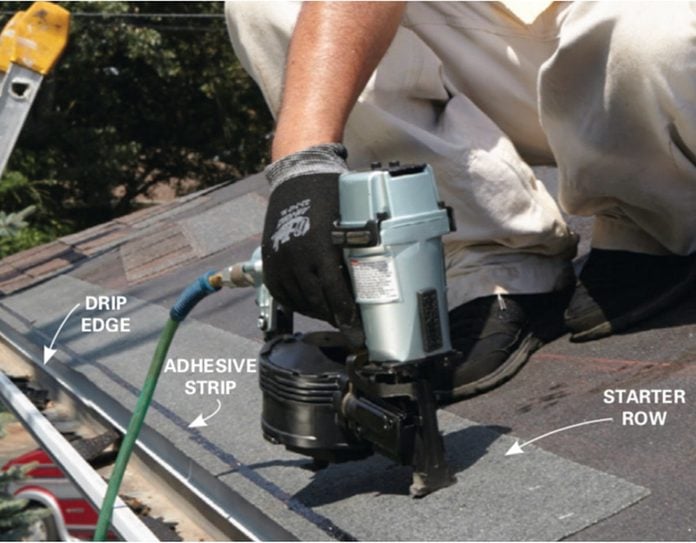
Run the row of starter shingles 1/2 in. past the baste edge. Position them so the adhesive strip is toward the bottom and facing upward. Place nails 2 to 3 in. upward from the lesser of the eave. Water can get in the seams between any two shingles, merely that's OK considering shingles overlap and the seams are staggered. But if y'all don't apply starter shingles, h2o will run in between the seams on the first row and correct onto the underlayment, increasing the odds of a leak. The starter row shingles are only one-half as wide equally a total shingle. If they were full size, the top half of the first row would have three layers of shingles instead of the two the rest of the roof has, causing a visible hump.
Don't bother snapping lines for the starter shingles; only overlap them iii/four in. past the baste border. Fasten them down with five nails about two to 3 in. up from the bottom of the eave. Position the starter shingles so the adhesive strip is toward the bottom and facing upwards (Photo nine). The adhesive strip bonds to the shingle above it, creating a squeamish tight seal, reducing the chance of air current damage and water infiltration.
Some pro roofers install starter shingles on the gable ends besides. It's not usually required, merely information technology provides a cleaner await. Hang gable-end starter shingles one/two in. past the rip edge, and make certain you overlap the starter shingle on the eave by 2 to iii in.
Rent or Purchase?
Unless your roof is tiny, you lot're going to desire to become your hands on a pneumatic roofing nailer. Prices range from $100 to $300. Renting ane costs almost $35 a solar day or $90 a calendar week, so if you ain a compressor, you lot might every bit well buy rather than rent. A compressor rents for most the same as the nailer. If yous don't own a compressor and know yous're going to stop your business firm in less than a week, then renting is probably the way to become.
If yous do purchase a roofing nailer and you know you'll only use information technology for one job, a cheaper model will work simply fine. It just won't exist as durable every bit the high-stop models the pros use. Simply don't tell anyone you bought information technology. If the word spreads that you're a roofing gun owner, you run the risk of existence recruited by a whole bunch of friends and neighbors to help work on their roofs.
Stride 9
Install the shingles
Blast on shingles
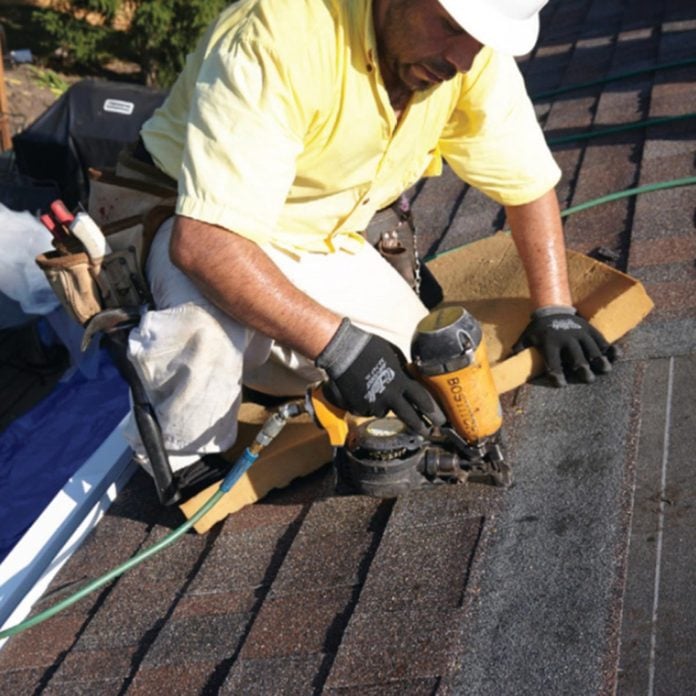
Post-obit the manufacturer's nailing instructions is critical; improper nailing is the biggest cause of roof failures in storms. Where and how often you nail your shingles will depend on current of air speeds in your area and the pitch of your roof.
Footstep 10
Run shingles long, and then trim them off
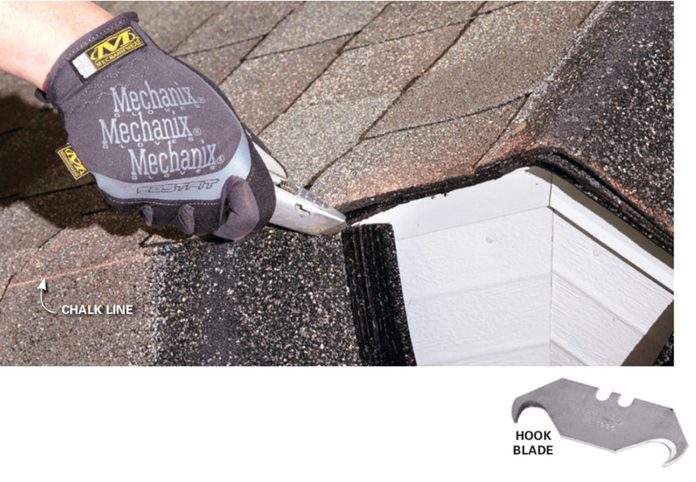
For nice direct lines, run shingles over the edge of the roof. Then snap a chalk line and trim them off with a hook blade in your utility knife. If the overhang is more a foot, cut some off and use the residuum elsewhere.
Hook blade
Hook blades are used for cutting shingles. They fit into any standard utility pocketknife just like direct blades. Laying shingles isn't easy, just it's probably the simplest part of roofing a house. Line upward the lesser of the commencement row of shingles with the bottom edge of the starter row, making sure the seams are staggered. With that row complete, you'll demand to figure out the reveal (the portion of the shingle that isn't covered by the one above information technology). Standard reveals vary between 5 and 6-ane/ii in. Whatever the reveal is supposed to be, snap a horizontal line that altitude from the height of the first row of shingles (come across Figure A, above).
Your roofing gun should have an adaptable guide to assist proceed the rows direct. If it doesn't, cut a block of wood the same size every bit your reveal and utilize that as a gauge. Slightly wavy rows won't be noticeable from the ground, so only snap lines every several rows to straighten things out. Information technology's easier to work from correct to left if you're right-handed. Stagger each row then the seams don't line up. Follow the stagger design recommended by the manufacturer of your shingles. Use partial shingles to starting time subsequent rows.
No one will notice if the concluding rows are not the same size on both sides of the ridge, but it can be very noticeable if the row that meets the ridge has a 4-in. reveal on one side and a 1-in. reveal on the other. One time you lot go within 8 ft. of the ridge, measure down to your shingles at each finish of the row. If one side is closer to the acme than the other, snap lines for all the remaining rows, making the reveal on 1 side progressively larger until you brand up the difference. Don't conform any row by more than 3/sixteen in.
Every shingle brand has its ain nailing pattern requirement. The pitch of your roof and the wind conditions in your expanse also affect how many nails to use and where. Most shingles crave four to six nails, about 1 in. in from each side and placed so they go covered at least ane in. by the shingle above them. The nails should penetrate the decking at to the lowest degree iii/4 in. Most pros use ane-i/4-in. zinc-coated roofing nails.
Boom directly into the shingle, and suit the setting on your gun or the pressure level on your compressor so the nails pull the shingle tight to the decking but stay flush with the surface. Keep a hammer shut at hand to take care of nails that get only partially driven in. And never apply staples! Even if a buddy has an old covering stapler with free staples, politely pass up. Staples don't have the holding power of nails; they tend to rust out earlier the shingles become bad; and most manufacturers don't permit staples, so you lot'll void the warranty.
When you achieve the ridge, use the same technique equally you did with the felt paper: Wrap the starting time side over the meridian, and then wrap the second side over the commencement. Cut the shingles to size with a utility knife fitted with hook blades. Run the shingles long over hip ridges and rakes, and in the valleys. When you lot're all done installing the shingles, snap lines and trim the shingles to the line (Photo xi).
Architectural vs. Three-Tab Shingles
The shingles shown here are unremarkably called "architectural." Some architectural shingles are partially laminated (ii layers), and others are fully laminated, which gives them more of a textured expect, similar to wood shakes. Considering of the extra material, architectural shingles are heavier. Some can handle winds upwards to 150 mph, which is twice the current of air rating of many three-tab shingles.
Architectural shingles are easier to install because you don't take to worry nigh lining up the tabs vertically. The life span depends on the quality of the shingle. Both styles are available with 25-year and 30-twelvemonth warranties. Look to pay about 15 to 20 percent more for standard architectural shingles than for standard three-tabs.
Whichever you cull, brand sure all the bundles have the aforementioned "lot" number on the packaging. That means they were all made in the aforementioned batch or run. Shingle color can vary noticeably from one batch to another.
Install step and dormer flashing
It'south possible to reuse existing step flashing and dormer flashing, only the best way to get a watertight seal is to tear off the siding in those areas and install new flashing. Starting time by running self-stick underlayment at least half dozen in. upward onto the walls. This provides an additional bulwark if water does get past the flashing. Cover the front wall start and and then work your way up the side wall. Overlap the sidewall underlayment around the corner onto the front wall well-nigh 1 in. or then.
Install the shingles correct up to the front wall. Cut a couple of inches off the vertical portion of the dormer flashing, and run the horizontal portion past the side wall that same distance. Blast the dormer flashing to both the wall and the shingles.
Brand a one- to ii-in. cut with a tin can snips at the curve in the first footstep flashing. Run a dewdrop of sealant on the corner border of the dormer flashing, and then run that pace flashing by the dormer flashing the same distance y'all made your cut. Bend the stride flashing around the corner onto the dormer flashing with your hammer.
Install your next row of shingles over that first pace flashing, so cover that row with a step flashing, and so on. Smash the pace flashing to the wall toward the pinnacle of the flashing at the end that's closer to the meridian, then the next pace flashing in line will cover the nail. Don't smash them down through the shingles. For information about flashing around chimneys, see Installing Chimney Flashing.
Figure B: Pace and Dormer Flashing
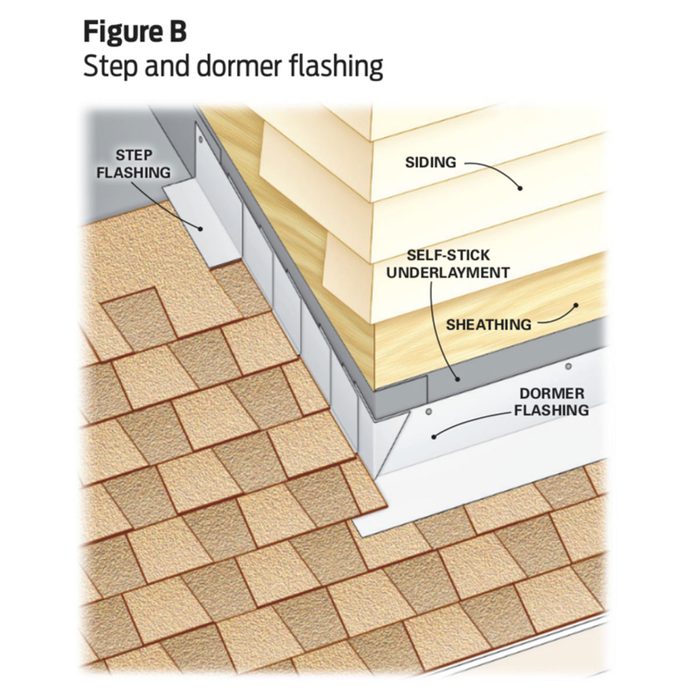
Weave the step flashing and the roof shingles together and so that h2o can't get under the shingles. Pay careful attention to the corner details.
Step 11
Working effectually vents and stacks
Make plumbing vents leakproof
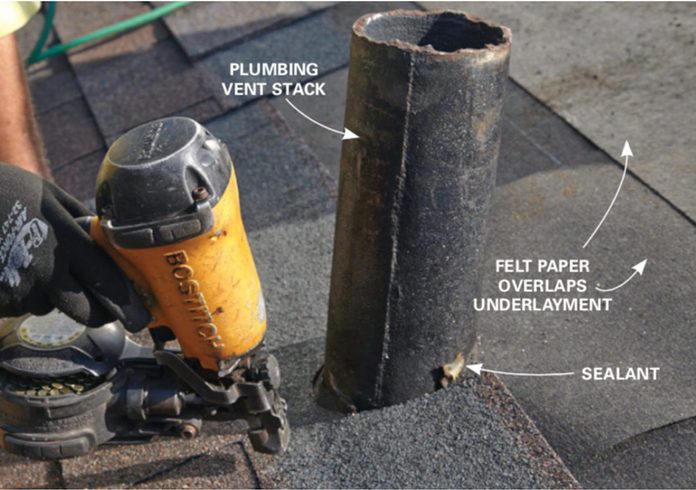
Install a layer of underlayment around vent pipes and caulk with roof sealant before shingling. Run shingles halfway by vents before installing vent flashing.
Step 12
Add the vent flashing
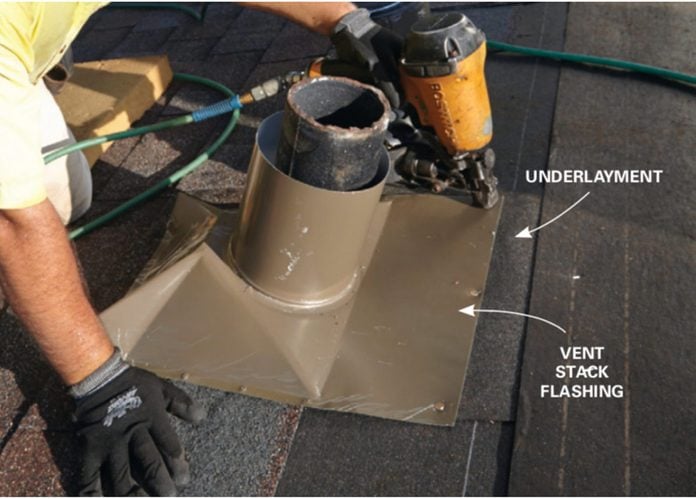
Drive three nails forth the elevation edge of the flashing and i at each of the lower corners.
Step 13
Shingle over the vent flashing

Seal the nail heads, and trim around the stack flashing with a utility knife fitted with hook blades.
Stride fourteen
Add ventilation

If you lot need more ventilation, cut boosted vent holes in the decking with a circular saw and install vent flashing. Installing shingles around attic vents, plumbing vent stacks and furnace stacks is basically the aforementioned process. The master difference is that y'all'll install a piece of self-stick underlayment around all the stacks, but you simply need to curl the felt paper over the vent holes and cut out the holes. When installing the felt paper over a stack, it's OK to make an oversize hole. But before you roll out the row of newspaper above the stack, cut a 2- or 3-ft. section of self-stick underlayment, cutting a pigsty in information technology slightly smaller than the bore of the stack, and slide it over the stack. Make sure the slice is large enough and then that the side by side row of felt paper overlaps the top at least a couple of inches (Photo 12). Caulk around the pipe when you lot're done.
Install the shingles up and halfway past the vent hole or stack. Next, install your vent or stack flashing over that row of shingles (Photo 13). Nail information technology down with your roofing gun, top and bottom.
Seal the top boom holes and keep on up with your shingles. Trim the shingles with your utility knife (Photograph 14). Some vent and stack flashing is covered in protective plastic, which will have to exist removed.
If you're installing the blazon of stack flashing with a rubber kick that seals around the pipe, spray-paint the piping a similar colour as your roof. You can likewise paint electrical masts and other projections (before installing shingles). This simple stride adds a lot to the finished await of your roof.
To find out if you have proper attic ventilation, search attic ventilation calculator (GAF has i version). Just type in the dimensions of your cranium to acquire how many vents you demand. If y'all don't have acceptable ventilation, cut in more than holes with a round saw (Photo 15).
Stride 15
Cap the ridge
Cap the ridge
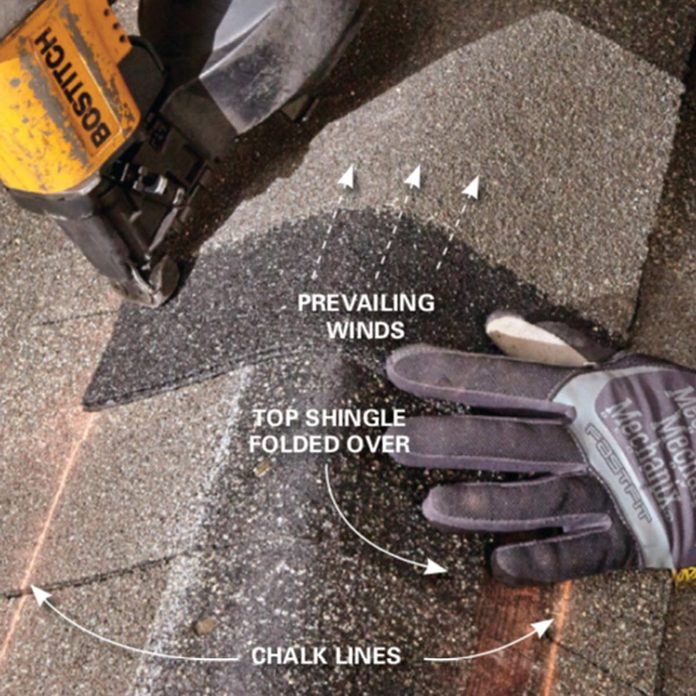
Snap chalk lines to help proceed the row of ridge cap shingles straight. Install the ridge cap and so the prevailing winds accident over the overlap seams, not into them. Once all your shingles are installed, you'll need to embrace (cap) the ridge (and hip ridges if you have a hip roof). The top ridge cap shingles will overlap the hip ridge cap, so start with the hips. Snap a couple of guide lines but a trivial inside the perimeter of the ridge and then the lines get covered upwardly when you're washed. Blast each shingle on both sides about 1 in. in a higher place the overlap seam (Photo 16). Store-bought architectural-style ridge caps are often ii layers thick, to match the look of the shingles. You lot may need longer nails to fasten the ridge considering of all the extra layers of shingles.
Install the superlative ridge cap so the prevailing winds blow over the overlaps rather than into them. If wind isn't an issue, commencement at either side, or start at both sides and end in the middle. Rip the meridian half off the concluding ridge cap shingle, and nail through the face of information technology with two nails on the ends of each side.
Seal it up
Earlier you put your ladder away, sweep all the debris off the roof, and and then seal all the exposed nails on your vents and stack flashing. If you used stack flashing that has the condom boot, seal the area where prophylactic meets the pipage. Avoid silicone (it won't hold up) and asphalt-based sealants (they tend to dry out out when exposed to direct sunlight). Our roofers prefer a product called Lexel available through our affiliation with Amazon.com. It's clear similar silicone, viscous as model mucilage and lasts for years. And remember, these areas you sealed require maintenance—they should exist inspected every few years.
Originally Published: July 24, 2021

How To Add A Pitch Only On One Side Of Flat Roof,
Source: https://www.familyhandyman.com/project/how-to-roof-a-house/
Posted by: boltonhicing.blogspot.com
0 Response to "How To Add A Pitch Only On One Side Of Flat Roof"
Post a Comment